Moving the Users Folder
Read fully before starting this procedure
Important note: The purpose of moving your users folder is to increase your speed by utilizing two different sources to supply data to your processors. 2 drives are faster than one...as long as they are both able to send data at the same time.
If you have 2 ATA drives on a single cable (master/slave) you will see no speed increase at all. ATA controllers can only 'talk' to one device at a time so it defeats the purpose of moving the users folder. If you have 2 ATA controllers then your good to go. But I would advise using one drive per controller as having a slave present will slow down access to the drive your running from.
SATA drives are one drive per channel so a pair of these will work well, 2 SATA drives means 2 channels.
LVD SCSI is 15 drives per channel and would work VERY well because SCSI does not suffer from the same inadequacies that plague ATA. And it's fast..VERY fast. (if you have the phat $$ for SCSI, that is)
Please read these instructions carefully and fully prior to starting the procedure. You may email Damien with any questions you may have.
You will need the following items: Carbon Copy Cloner, and SymbolicLinker. Download and install both these items per the instruction provided with them. You may use a different cloning app if you like and drag and drop in the finder works too. You may use the terminal to make the Symbolic Links if you like. More on this later.
You will need to log in as root during this procedure. For enabling root access and instructions for logging in as root go here.
Be sure to always start with a system that is working well. Also be sure to get the latest version of whatever cloning application you choose to use. This pages uses Carbon Copy Cloner.
Early versions of OS 10.4 mixed with not quite up to date versions of CCC will result in you being stopped before you even get started. More info at the bottom of this page. The latest OS and the latest CCC work well.
After your done moving your users, you might want to check out this interesting system mod... here. Learn about symlinking your Applications folders
Reported Issues are at the bottom
Carbon Copy Cloner image is copyright to Mike Bombich all other images are copyright to Apple Computer. Concerns can be addressed to Damien
Use these instructions at your own risk. By using these instruction you are agreeing to hold only yourself responsible for any data loss or damage. Specifically Apple, Mike Bombich, Macmeisters, and Damien, nor any affilliates of the aforementioned, will NOT be held responsible for anything you do nor for any resulting consequences from the use of these instructions.
A small amount of image manipulation was done on some of these images. This was done to clarify the written instructions and for my privacy. Thanks to Thornton Lemke's Graphic Converter for that. The poor quality of the edits should be blamed solely on me.
And so it begins.....
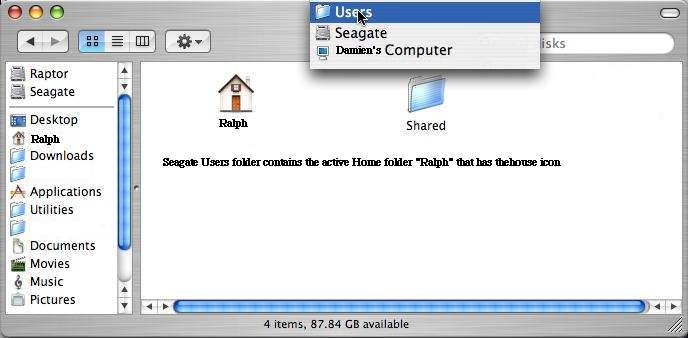
For this procedure we will assume that your volume names are Seagate and Raptor and that your User name is Ralph.
You will have to change these names to reflect your setup. Make sure when you change the names you observe both upper and lower case AND that you include any spaces you may have in your hard drive names. Also you will want the name of your home folder NOT your full account name. In some cases these may be the same but in many cases they are not.
Further we will assume that you are booted from the Seagate and that the setup you want is that you will boot from the Raptor and have your Users folder on the Seagate.
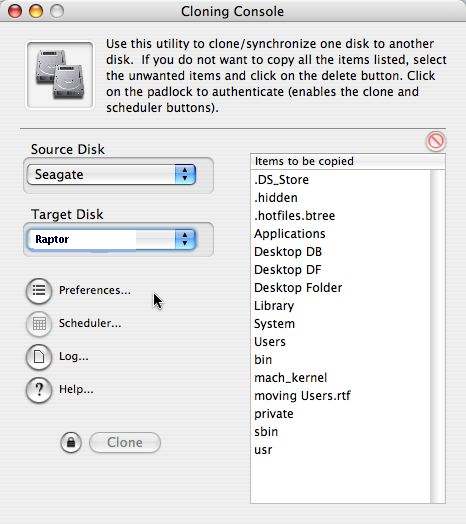
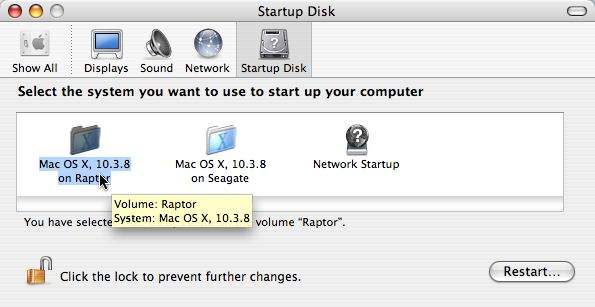
Step 1) Use Carbon Copy Cloner to duplicate your current boot drive (Seagate) to your new boot drive (Raptor) . Select your new boot drive as your Startup Disk and restart using your new drive. You must be booted from your new boot drive before proceding to step 2.
Early versions of OS 10.4 and Carbon Copy Cloner would not allow a clone to be made so make sure you have the latest versions.
You may choose to use a different cloning application or you may choose to use the finder and just drag and drop what you need. For this procedure all that needs moved is the Users folder from your original drive to the place where you want to use it from.
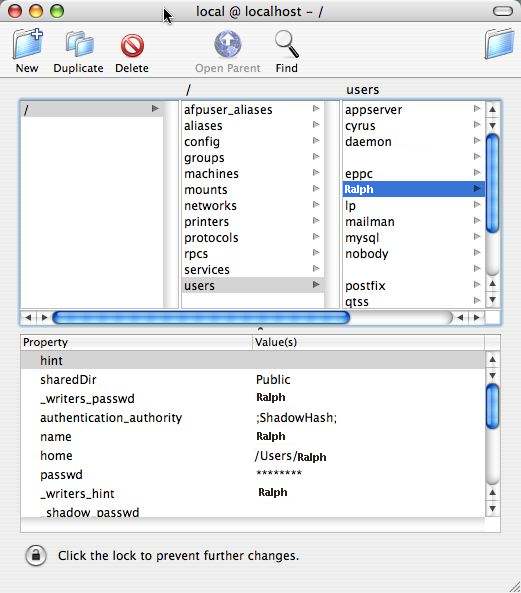
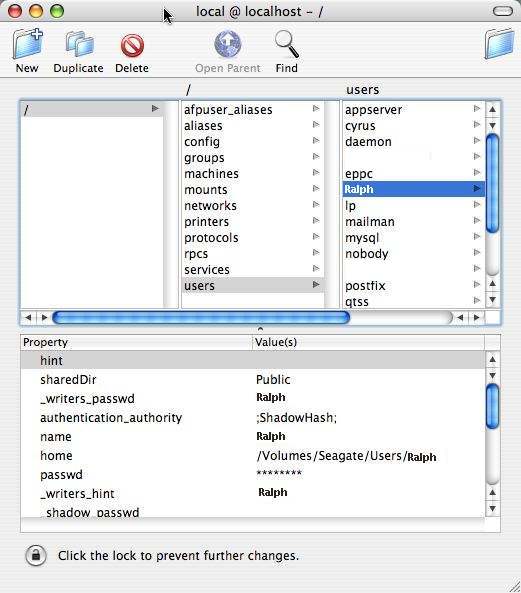
Step 2) Log out of your admin/user account and log back in as root (instructions for enabling and logging in as root are here). Launch NetInfo Manager(in your Utilities folder), select the Users table (from the center pane) and unlock (lower left corner). Select your user name in the table (right pane) and, in the lower window, look 6 lines down to where it says Home. The Value for your Home should say /Users/Ralph. Double click /Users/Ralph to make it editable and change it to read /Volumes/Seagate/Users/Ralph * Hit Command-S to save (answer yes to the update? dialogue box) When you've done all users ** go to the Management menu and choose Restart Local NetInfo Domains Then quit NetInfo Manager.
Before the changes
After the change
** If you have more than one user account you must perform the NetInfo Manager changes for every user account.
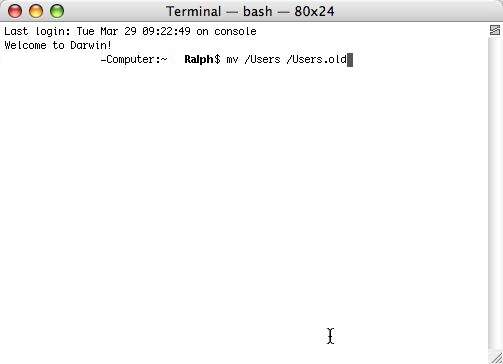
Step 3) While still logged in as root, you now need to rename your original users folder on your Raptor. Launch the Terminal app (in the Utilities folder) and type
mv /Users /Users.old
Then hit return.
ANY terminal commands are both case and space sensitive. This renames your /Users folder on your Raptor boot drive to /Users.old. There are 2 spaces in the above terminal command, one after the V and one after the second S from the left. Terminal commands must be typed EXACTLY. I suggest you copy and paste the above command into the terminal
Quit the Terminal and log out of root and log back in with your admin/user account.
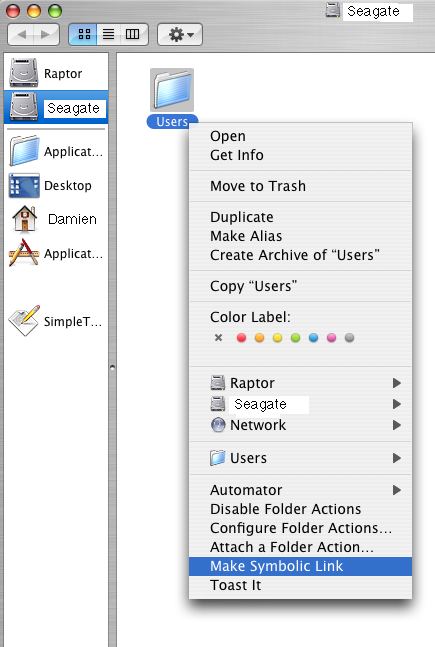
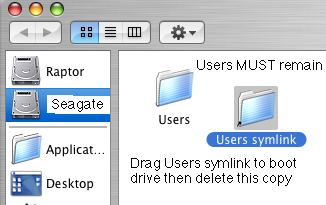
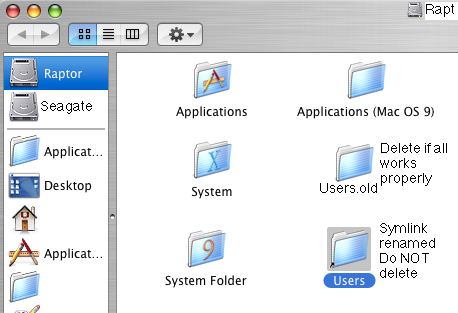
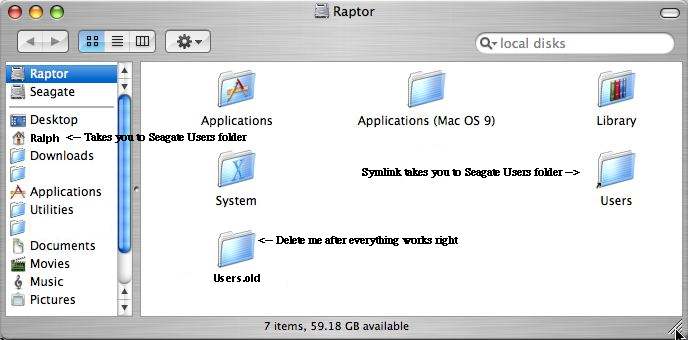
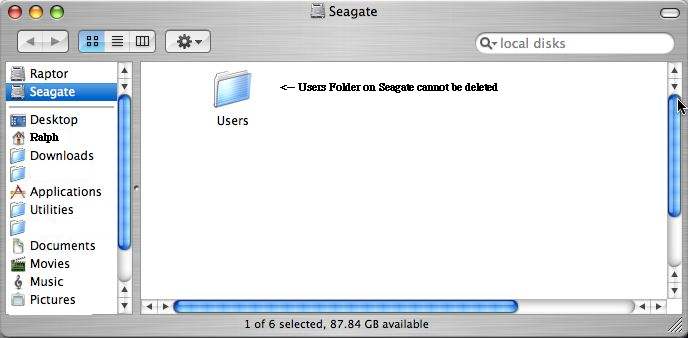
Step 4) Ok you should now be booted from the Raptor and using your Users folder on the Seagate drive. The last thing to do is make a symbolic link on the Raptor that points to your Users folder on the Seagate drive. Open the Seagate drive so you can see the unopened Users folder. Right click (or control click if you have a single button mouse) on the Users folder to bring up the contextual menus. Choose "Make Symbolic Link". This will give you a folder called "Users symlink" Drag this symlink to the Raptor drive. Once there rename it to "Users" (without the quotes) At this point you can delete the "Users symlink" folder that still exists on the Seagate drive. Do NOT delete your Users folder from the Seagate drive and do NOT delete the symlink of users that you placed on the Raptor
On the Seagate drive... This..
Results in this
On the Raptor
Your done!! Congratulations!!
If you would prefer to use the Terminal to create this symlink instructions can be found here.
Also you may want to check out this modification it is not necessary to do this for moving the users folder but it does come in handy for ease of use and especially if you plan to boot this same users folder from different boot drives
Cleanup...
Once you are sure everything is working properly you can delete the Users.old folder from your boot drive. From the Seagate drive you can delete everything EXCEPT the Users folder and its contents.
So far all reported issues have been due to an improperly created Symlink (step 4). If you don't see a folder alias icon that takes you to your user folder on your second drive then you have done something wrong. Remember, there are no typos or syntax errors allowed when in the terminal.
It has been reported that Disk Warrior doesn't like this setup. If you depend on this product then consider your options before using this setup. Unable to rebuild was the error DW gave, I don't use/have Disk Warrior so I can't test this. This person also reported they were unable to boot from the DW cd/dvd. This is a Disk Warrior issue as I have had no problem booting from the Apple Installer CD/DVD and the Hardware Test disk that Apple provides. Others have not had this problem. It seems later builds of DW have no issues and some earlier builds do have issues.
Update 4/13/05
Something to watch out for: If for some reason your Users drives fails to mount (like you forgot to turn on that firewire drive) and you try to log into your account the OS will create a new account using your name and password. It will say that it is your account but all your stuff will be gone. Don't panic. The fix is this: Your OS has created a folder with the name of your User drive and inside that folder is a user folder and a home folder inside that. This is located on the boot drive in the Volumes folder. As root go to the Volumes folder and delete this folder (the one with the same name as your user drive) and it's contents. Log out of root and restart your Mac, with all your drives turned on this time, log back in as your user account. This should not be an issue if both your drives are located inside your Mac unless you have a drive die. However a dead battery or uneven power from the wall, directory issues etc, can cause drives not to mount sometimes. **UPDATE** The Mac OS no longer displays this behaviour as of OS 10.4.4.
OS X 10.4 Tiger Info There have been a few reported issues with Tiger. Versions 10.4.0 thru 10.4.2 The biggest problem being that Carbon Copy Cloner no longer works. It fails to authenticate making any further processes impossible. Dragging and dropping your users folder to the location you want it seems to work just fine though it's slow.
One user reported that the Tiger 'Upgrade' install undid the changes necessary to use the Users folder on his second drive. It created a new users folder on the boot drive. Redoing steps 2, 3 & 4 got him going again in just a few minutes.
When I upgraded to Tiger, I returned to a single boot/users config by undoing the changes . Then I repaired permissions and did a simple upgrade. After I was sure that Tiger was working properly I then drug my users folder to my Seagate drive. Then I performed steps 2, 3 & 4 again. All is working as it should now, I am booting 10.4 from my Raptor and my active Users folder is on my Seagate drive.
Special thanks to all the Gurus at MacGurus.com for making this possible.
Thanks also goes to all the folks from Apple discussions who have tried my instructions and thankfully NOT blown up their Macs. :-)